
Here's the song that got me the title of the Blog.
Newest Post
Leave That Thing Alone
|
Wednesday, February 25, 2009
Read more »
Here's the song that got me the title of the Blog.
Here's the song that got me the title of the Blog.
2, 2 post's in one...
|
Tuesday, February 10, 2009
Read more »
...day.
Here is a test I was doing at work. I was asked a while back if I can make a helicopter crash into the ocean. So I did. Then they wanted to add some splash. So since then I have tooled around with Particle Flow and have started to get the hang of it a bit. It's a big program as far as all the different ways you can create the events but I'm getting there!
Here is a test I was doing at work. I was asked a while back if I can make a helicopter crash into the ocean. So I did. Then they wanted to add some splash. So since then I have tooled around with Particle Flow and have started to get the hang of it a bit. It's a big program as far as all the different ways you can create the events but I'm getting there!

Mental Ray skies
|
Wednesday, February 4, 2009
Read more »
 Here's another tip I just recently learned from various websites. Very nice pretty clouds built directly in Mental Ray and not with a panorama back ground image. As shown to the left it can come out pretty nicely with some tweaking.
So how is this done? First you need a sky map. I read that you can use either color or black and white, I seem to have better results using the black and whites better. Make sure to play with your brightness and contrast settings though to make the image pop. That will help give you more blues and whites in the render. I made this one with a standard panorama, doubled the height and added a small gradient under neath. You need to have it look this way in order to have your horizon line be in the correct spot. First time I tried this I used a plan panorama and it just didn't look correct at all.
Now open your Max and drop in your day light system. turn your mr daylight system on. Under the Environment tab you'll need to drag the shader into the Material map. From there you'll get all the settings you'll need to make your sky.
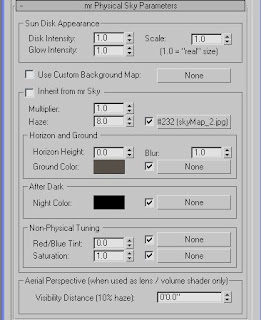
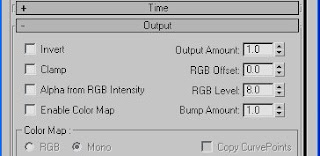
The first set of settings you must adjust is in the mr Physical Parameters. Un-check the Inherit from mr Sky box. This will get you access to all the Haze settings, which is what you use to create the skies. First one is the Haze setting. Iused these settings to get my image the way I wanted but you's may be different depending on the image files. By razing the Haze level you begin to show off more haze... so this way your cloud image with be shown. I believe this maxs out at 15. From there you must select the bitmap and head to the output dialog box. The RGB level is what brings out the color. Go to high and your image becomes very saturated. In my case with this image it becomes extreamly yellow at around the 12-13 mark. I have at times found that playing with the other settings such as RGB offset and the multiplier controls for the haze have given me decent results, but you can generally get something nice without using them.
One thing to keep in mind is the over all image controls in the Environment tab. Changing the contrast, saturation, and so on can have a vast effect on the render of the image as well.
 Here's another tip I just recently learned from various websites. Very nice pretty clouds built directly in Mental Ray and not with a panorama back ground image. As shown to the left it can come out pretty nicely with some tweaking.
So how is this done? First you need a sky map. I read that you can use either color or black and white, I seem to have better results using the black and whites better. Make sure to play with your brightness and contrast settings though to make the image pop. That will help give you more blues and whites in the render.
 I made this one with a standard panorama, doubled the height and added a small gradient under neath. You need to have it look this way in order to have your horizon line be in the correct spot. First time I tried this I used a plan panorama and it just didn't look correct at all.
Now open your Max and drop in your day light system. turn your mr daylight system on. Under the Environment tab you'll need to drag the shader into the Material map. From there you'll get all the settings you'll need to make your sky.


The first set of settings you must adjust is in the mr Physical Parameters. Un-check the Inherit from mr Sky box. This will get you access to all the Haze settings, which is what you use to create the skies. First one is the Haze setting. Iused these settings to get my image the way I wanted but you's may be different depending on the image files. By razing the Haze level you begin to show off more haze... so this way your cloud image with be shown. I believe this maxs out at 15. From there you must select the bitmap and head to the output dialog box. The RGB level is what brings out the color. Go to high and your image becomes very saturated. In my case with this image it becomes extreamly yellow at around the 12-13 mark. I have at times found that playing with the other settings such as RGB offset and the multiplier controls for the haze have given me decent results, but you can generally get something nice without using them.
One thing to keep in mind is the over all image controls in the Environment tab. Changing the contrast, saturation, and so on can have a vast effect on the render of the image as well.


