
Newest Post

Mental Ray skies
|
Wednesday, February 4, 2009
Read more »
 Here's another tip I just recently learned from various websites. Very nice pretty clouds built directly in Mental Ray and not with a panorama back ground image. As shown to the left it can come out pretty nicely with some tweaking.
So how is this done? First you need a sky map. I read that you can use either color or black and white, I seem to have better results using the black and whites better. Make sure to play with your brightness and contrast settings though to make the image pop. That will help give you more blues and whites in the render.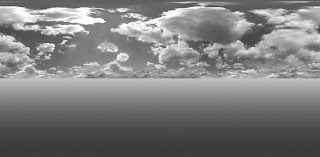 I made this one with a standard panorama, doubled the height and added a small gradient under neath. You need to have it look this way in order to have your horizon line be in the correct spot. First time I tried this I used a plan panorama and it just didn't look correct at all.
Now open your Max and drop in your day light system. turn your mr daylight system on. Under the Environment tab you'll need to drag the shader into the Material map. From there you'll get all the settings you'll need to make your sky.
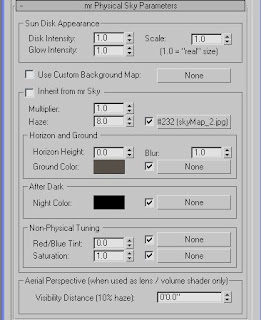
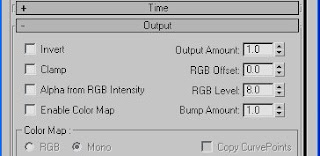
The first set of settings you must adjust is in the mr Physical Parameters. Un-check the Inherit from mr Sky box. This will get you access to all the Haze settings, which is what you use to create the skies. First one is the Haze setting. Iused these settings to get my image the way I wanted but you's may be different depending on the image files. By razing the Haze level you begin to show off more haze... so this way your cloud image with be shown. I believe this maxs out at 15. From there you must select the bitmap and head to the output dialog box. The RGB level is what brings out the color. Go to high and your image becomes very saturated. In my case with this image it becomes extreamly yellow at around the 12-13 mark. I have at times found that playing with the other settings such as RGB offset and the multiplier controls for the haze have given me decent results, but you can generally get something nice without using them.
One thing to keep in mind is the over all image controls in the Environment tab. Changing the contrast, saturation, and so on can have a vast effect on the render of the image as well.
 Here's another tip I just recently learned from various websites. Very nice pretty clouds built directly in Mental Ray and not with a panorama back ground image. As shown to the left it can come out pretty nicely with some tweaking.
So how is this done? First you need a sky map. I read that you can use either color or black and white, I seem to have better results using the black and whites better. Make sure to play with your brightness and contrast settings though to make the image pop. That will help give you more blues and whites in the render.
 I made this one with a standard panorama, doubled the height and added a small gradient under neath. You need to have it look this way in order to have your horizon line be in the correct spot. First time I tried this I used a plan panorama and it just didn't look correct at all.
Now open your Max and drop in your day light system. turn your mr daylight system on. Under the Environment tab you'll need to drag the shader into the Material map. From there you'll get all the settings you'll need to make your sky.


The first set of settings you must adjust is in the mr Physical Parameters. Un-check the Inherit from mr Sky box. This will get you access to all the Haze settings, which is what you use to create the skies. First one is the Haze setting. Iused these settings to get my image the way I wanted but you's may be different depending on the image files. By razing the Haze level you begin to show off more haze... so this way your cloud image with be shown. I believe this maxs out at 15. From there you must select the bitmap and head to the output dialog box. The RGB level is what brings out the color. Go to high and your image becomes very saturated. In my case with this image it becomes extreamly yellow at around the 12-13 mark. I have at times found that playing with the other settings such as RGB offset and the multiplier controls for the haze have given me decent results, but you can generally get something nice without using them.
One thing to keep in mind is the over all image controls in the Environment tab. Changing the contrast, saturation, and so on can have a vast effect on the render of the image as well.

Gamma corrections
|
Thursday, January 22, 2009
Read more »
I just wanted to add this both for I and anyone that may be looking for a reason as to why this is happening. What I am talking about is a color looking very bland and faded when rendering in  Mental Ray. What causes this is the Gamma fields being incorrect. To fix this problem you simply have to add a Utility Gamma shader before inserting your bitmap. So here's what I am talking about and how it's done.
To the left you can see what I am talking about. The ball on the left is faded and not the same as the one on the right, the correct color. Again it's just a simple shader that you can add to correct this. Just before you add your bitmap to your diffuse layer make sure to add the 'Utility Gamma & Gain (mi)' as shown to the right. By adding this it will color correct you to the correct intensity. Wood looking dull? Add the Gamma and Gain shader! Red's looking pink> Add the Gamma and Gain shader! It instantly places your Gamma at a 2.2 setting. From the best I can tell from reading it's almost always the correct setting. I haven't read much that says you should change it. But by adding this shader you will correct your texture like the image above of the 2 red balls.
 Need another way to do this? Maybe you need the entire scene to be corrected and you don't want to place this into your texture stack every time? Well you can go into your 'Preferences' tab and do this as well. By activating this you will turn your Gamma settings on in the same way that you did when adding it just before your bitmap is in place! One thing I noticed when doing this is every time I open Max up it would have the settings still the same as I left it. So if I activated the Gamma then when I opened Max it still would be and in the new scene I'm working on everything may be rendering incorrectly now. So just keep in mind when using this way of correcting your Gamma settings!
 Mental Ray. What causes this is the Gamma fields being incorrect. To fix this problem you simply have to add a Utility Gamma shader before inserting your bitmap. So here's what I am talking about and how it's done.
To the left you can see what I am talking about. The ball on the left is faded and not the same as the one on the right, the correct
 color. Again it's just a simple shader that you can add to correct this. Just before you add your bitmap to your diffuse layer make sure to add the 'Utility Gamma & Gain (mi)' as shown to the right. By adding this it will color correct you to the correct intensity. Wood looking dull? Add the Gamma and Gain shader! Red's looking pink> Add the Gamma and Gain shader! It instantly places your Gamma at a 2.2 setting. From the best I can tell from reading it's almost always the correct setting. I haven't read much that says you should change it. But by adding this shader you will correct your texture like the image above of the 2 red balls.
 Need another way to do this? Maybe you need the entire scene to be corrected and you don't want to place this into your texture stack every time? Well you can go into your 'Preferences' tab and do this as well. By activating this you will turn your Gamma settings on in the same way that you did when adding it just before your bitmap is in place! One thing I noticed when doing this is every time I open Max up it would have the settings still the same as I left it. So if I activated the Gamma then when I opened Max it still would be and in the new scene I'm working on everything may be rendering incorrectly now. So just keep in mind when using this way of correcting your Gamma settings!
New update
|
Tuesday, January 13, 2009
Read more »
 It's been a while since I have written on here but I have a small update to add here. I have continued my work with my room. Since the last update I have adjusted the camera and some of the textures as well. I have tweaked the settings of the camera as well so that the contrast is more evident. I have some more work I'd like to put into this such as curtains along the windows and books on the shelving in the back of the room. Also needing some sort of image for the windows. Don't want to see strange lines floating around out there now do we?!
All in all it's coming along here in a short time since I started the scene back up.
 It's been a while since I have written on here but I have a small update to add here. I have continued my work with my room. Since the last update I have adjusted the camera and some of the textures as well. I have tweaked the settings of the camera as well so that the contrast is more evident. I have some more work I'd like to put into this such as curtains along the windows and books on the shelving in the back of the room. Also needing some sort of image for the windows. Don't want to see strange lines floating around out there now do we?!
All in all it's coming along here in a short time since I started the scene back up.
Video of finished Scene
|
Wednesday, December 3, 2008
Read more »
So I have a video I can show everyone. I am upset..... of course as usual I want to add some things to this. I'm learning some techniques of adding some very nice looking clouds to the Mental Ray Physical skies. Like to add some other small details too. That stuff I may add eventually. Now it's onto the interior render I was working on before I started this scene!


 Posts
Posts


