Newest Post

Flicker

| Wednesday, May 6, 2009
Read more »
So I read Master Zap's blog fairly often. It's how I've learned so much the past year. That plus lots of surfing the internet for anything to help me out when I got stuck. One of the things that was killing the animations I am making here was the flickering and I had read his blog on how to fix it but it never came up as something that bothered them here but I could see it. A animation I recently created with an overpass had tons of flicker problems because of the amount of shadow you saw so I figured great time to try his solution.
It's pretty simple actually. As far as I have read about the new Max 2010 they have this fixed but if.....if you still need to fix it Zap's way works wonders. All you need to do in Mental Ray is set your Final Gather settings all the way down and dumby down the rest of the quality. It's not needed. The section under Final Gather Map needs to be turned on to Read/Write File. Render the animation out. You dont save any files but the Final Gather Map. Then when its done (which should be rather fast since it's a basic render) you uncheck the Read/Write File and check on the Read Only. This file from how I understand it has now saved your FG maps from every frame and doesn't make it create one for each render which speeds up the render time I noticed some but also now gives the render no flicker.
My animation is great and clean! Awesome short cut and if Max 2010 fixed this I hope it works as good!

Flicker

Posted by : Sourpickle
Date :Wednesday, May 6, 2009
With 0comments
Tag :

Nice helpful Modifiers

| Thursday, March 26, 2009
Read more »
Haven't posted in a long while but wanted to throw this one in there. It'll be short. I have been using 2 different modifiers in my stack for the past few months almost all the time now and it's been making my life sooooo much easier.

One would be the Xform. The use of this mod is to allow me to scale my object without causing damage to the actual models scale. Because I'm scaling the gizmo of the Xform modifier it doesn't harm my main model. Which I have read is good for when you get into wire parameters and such when animating. The second would be a very simple one but has made my models cleaner in the Vertex Weld. I've had to do a lot of small models lately..... I mean small. I've never made a 2cm by 11mm model before up until about a month or two ago. So going in selecting a group and hitting the weld button can be a pain. I use this mod for when I get to a point when the model needs cleaning or at the end to make sure it's clean and all parts are welded. It's nice, simple, and fast!

Nice helpful Modifiers

Posted by : Sourpickle
Date :Thursday, March 26, 2009
With 1 comments:
Tag :

Leave That Thing Alone

| Wednesday, February 25, 2009
Read more »


Here's the song that got me the title of the Blog.

Leave That Thing Alone

Posted by : Sourpickle
Date :Wednesday, February 25, 2009
With 2comments
Tag :

2, 2 post's in one...

| Tuesday, February 10, 2009
Read more »
...day.

Here is a test I was doing at work. I was asked a while back if I can make a helicopter crash into the ocean. So I did. Then they wanted to add some splash. So since then I have tooled around with Particle Flow and have started to get the hang of it a bit. It's a big program as far as all the different ways you can create the events but I'm getting there!

2, 2 post's in one...

Posted by : Sourpickle
Date :Tuesday, February 10, 2009
With 0comments

Room rendering

|
Read more »
Well I sent off a render last night and here is what I got. There are a few little funky things going on here on the couch but over all it looks pretty nice. Sent it off on the highest settings. Still going to try an clean up a few spots but I think it looks pretty good over all.


Room rendering

Posted by : Sourpickle
Date :
With 0comments

Mental Ray skies

| Wednesday, February 4, 2009
Read more »
Here's another tip I just recently learned from various websites. Very nice pretty clouds built directly in Mental Ray and not with a panorama back ground image. As shown to the left it can come out pretty nicely with some tweaking.
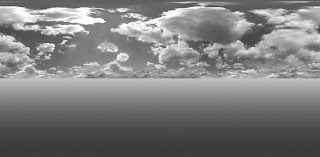
So how is this done? First you need a sky map. I read that you can use either color or black and white, I seem to have better results using the black and whites better. Make sure to play with your brightness and contrast settings though to make the image pop. That will help give you more blues and whites in the render. I made this one with a standard panorama, doubled the height and added a small gradient under neath. You need to have it look this way in order to have your horizon line be in the correct spot. First time I tried this I used a plan panorama and it just didn't look correct at all.
Now open your Max and drop in your day light system. turn your mr daylight system on. Under the Environment tab you'll need to drag the shader into the Material map. From there you'll get all the settings you'll need to make your sky.

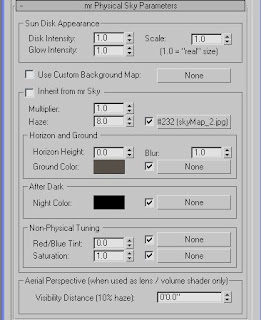
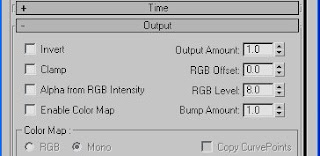
The first set of settings you must adjust is in the mr Physical Parameters. Un-check the Inherit from mr Sky box. This will get you access to all the Haze settings, which is what you use to create the skies. First one is the Haze setting. Iused these settings to get my image the way I wanted but you's may be different depending on the image files. By razing the Haze level you begin to show off more haze... so this way your cloud image with be shown. I believe this maxs out at 15. From there you must select the bitmap and head to the output dialog box. The RGB level is what brings out the color. Go to high and your image becomes very saturated. In my case with this image it becomes extreamly yellow at around the 12-13 mark. I have at times found that playing with the other settings such as RGB offset and the multiplier controls for the haze have given me decent results, but you can generally get something nice without using them.
One thing to keep in mind is the over all image controls in the Environment tab. Changing the contrast, saturation, and so on can have a vast effect on the render of the image as well.

Mental Ray skies

Posted by : Sourpickle
Date :Wednesday, February 4, 2009
With 1 comments:

Gamma corrections

| Thursday, January 22, 2009
Read more »
I just wanted to add this both for I and anyone that may be looking for a reason as to why this is happening. What I am talking about is a color looking very bland and faded when rendering in Mental Ray. What causes this is the Gamma fields being incorrect. To fix this problem you simply have to add a Utility Gamma shader before inserting your bitmap. So here's what I am talking about and how it's done.

To the left you can see what I am talking about. The ball on the left is faded and not the same as the one on the right, the correct color. Again it's just a simple shader that you can add to correct this. Just before you add your bitmap to your diffuse layer make sure to add the 'Utility Gamma & Gain (mi)' as shown to the right. By adding this it will color correct you to the correct intensity. Wood looking dull? Add the Gamma and Gain shader! Red's looking pink> Add the Gamma and Gain shader! It instantly places your Gamma at a 2.2 setting. From the best I can tell from reading it's almost always the correct setting. I haven't read much that says you should change it. But by adding this shader you will correct your texture like the image above of the 2 red balls.

Need another way to do this? Maybe you need the entire scene to be corrected and you don't want to place this into your texture stack every time? Well you can go into your 'Preferences' tab and do this as well. By activating this you will turn your Gamma settings on in the same way that you did when adding it just before your bitmap is in place! One thing I noticed when doing this is every time I open Max up it would have the settings still the same as I left it. So if I activated the Gamma then when I opened Max it still would be and in the new scene I'm working on everything may be rendering incorrectly now. So just keep in mind when using this way of correcting your Gamma settings!

Gamma corrections

Posted by : Sourpickle
Date :Thursday, January 22, 2009
With 0comments

New update

| Tuesday, January 13, 2009
Read more »
It's been a while since I have written on here but I have a small update to add here. I have continued my work with my room. Since the last update I have adjusted the camera and some of the textures as well. I have tweaked the settings of the camera as well so that the contrast is more evident. I have some more work I'd like to put into this such as curtains along the windows and books on the shelving in the back of the room. Also needing some sort of image for the windows. Don't want to see strange lines floating around out there now do we?!

All in all it's coming along here in a short time since I started the scene back up.

New update

Posted by : Sourpickle
Date :Tuesday, January 13, 2009
With 3comments
Next Prev
▲Top▲